GPU MODE Lecture 6: Optimizing Optimizers in PyTorch
- GPU MODE Lecture Notes: My notes from the GPU MODE reading group lectures run by Andreas Kopf and Mark Saroufim.
- YouTube Recording: Lecture 6 Optimizing Optimizers
- Slides: Optimizing optimizers in PyTorch
Introduction
- Presenter: Jane, a member of the PyTorch core team specializing in optimizers.
- Focus: Runtime optimization (speed) of optimizers, not memory optimization.
- Disclaimer: Some optimization techniques discussed may require increased memory usage.
Optimization Analogy: Towing Cars
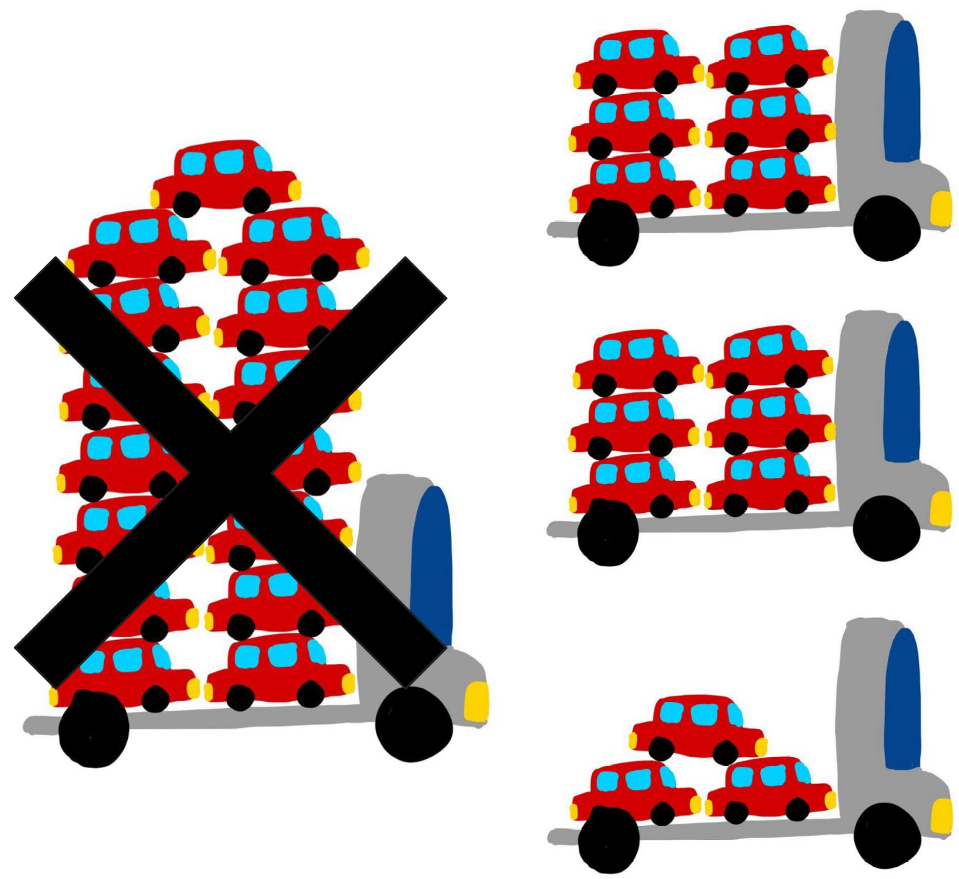
- Scenario: Towing 512 cars from point A to point B with a single truck.
- Options:
- Small truck: Carries one car at a time, requiring 512 trips (slow).
- Large truck: Carries eight cars at a time, requiring 64 trips (fast).
- Constraint: A low-clearance bridge on the route that the large truck cannot pass through.
- Trade-off: Runtime optimization (large truck) is desirable, but constraints (bridge) may necessitate choosing memory optimization (small truck) instead.
- Today’s Focus: Speed optimization, assuming no constraints.
Optimizer Basics and Optimization Levels
- Optimizers: Take a list of parameters (tensors) and gradients, and update parameters based on gradients.
- Example: SGD: Simple add and multiply operations between parameters, gradients, and a step size.
parameter = parameter - learning_rate * gradient
- Optimization Levels:
- Loop-Based:
Implementation: Processes parameters one by one in a for loop.
- torch/optim/adamw.py: _single_tensor_adamw()
Simplified Example:
for param in params:
    # Retrieve necessary data for the current parameter
    # Perform operations (add, multiply, lerp, etc.)
    # Update the parameter
Visualization: Each parameter update is a sequence of operations (gray circles), represented as a column. M operations per parameter, N parameters total, resulting in M x N operations.
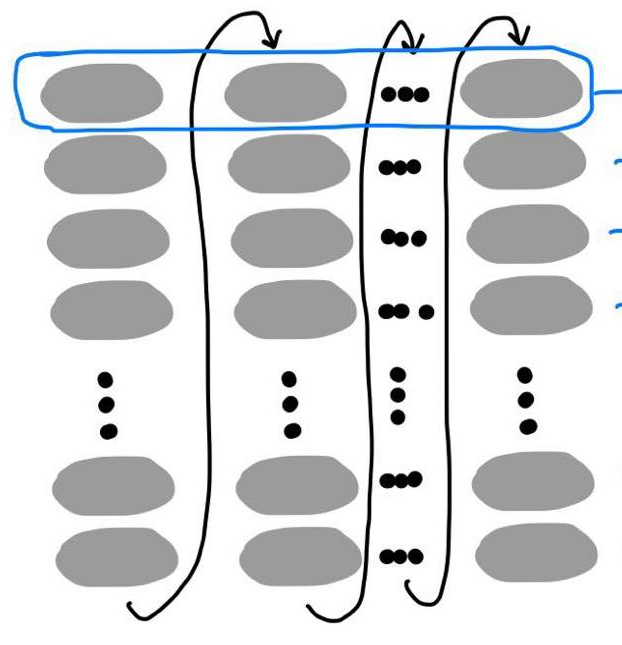
- ForEach:
Implementation: PyTorch’s current default; operates on entire parameter lists at once using vectorized operations.
- torch/optim/adamw.py:
_multi_tensor_adamw()
- torch/optim/adamw.py:
Simplified Example:
# Add a constant to all parameters in the list
# Multiply all parameters by a constant
# ... other operations
Visualization: Each operation (blue circles) is performed on all parameters simultaneously. M operations total.

- Fused:
- Implementation: Fastest option; uses a single CUDA kernel to perform all operations on all parameters at once.
- torch/optim/adamw.py:
_fused_adamw()
- torch/optim/adamw.py:
- Kernel Source: Inspired by NVIDIA Apex, PyTorch collaborates with NVIDIA to port and utilize fused CUDA kernels.
- Implementation: Fastest option; uses a single CUDA kernel to perform all operations on all parameters at once.
- Loop-Based:
- Key Idea: Reducing the number of CUDA kernel launches improves performance because kernel launches are expensive.
Multi-Tensor Apply: The Powerhouse
- Multi-Tensor Apply: An internal PyTorch function that enables operating on lists of tensors simultaneously.
- Analogy: Mitochondria is the powerhouse of the cell; multi-tensor apply is the “power truck” of PyTorch’s speedy optimizers.
- Example: Torch.add:
- Standard Add: Takes two tensors (self and other) and returns a result tensor.
- ForEach Add: Takes two tensor lists (self and other) and returns a result tensor list.
- CUDA Kernel Signatures:
Standard Add (Simplified):
__device__ void add_kernel(float* self, float* other, float* res, float alpha=1);ForEach Add (Challenge): How would you design a CUDA kernel signature to handle tensor lists?
Attempt 1: Passing Standard Vector (Failed)
- Idea: Pass a
std::vectorof pointers to tensors into the CUDA kernel. - Problem: CUDA does not support
std::vectoras a kernel argument; it won’t even compile.
Attempt 2: Passing Pointers to Pointers (Failed)
- Idea: Pass a
float**(pointer to a pointer) representing an array of tensor pointers. - Problem: The outer pointer resides on the CPU, leading to illegal memory access when the kernel tries to dereference it.
- Explanation:
- Standard Add: Pointers passed to the kernel are CUDA memory addresses, so dereferencing them within the kernel is valid.
- Pointers to Pointers: The outer pointer is a CPU memory address. When dereferenced within the kernel, it attempts to access CPU memory, resulting in an illegal memory access error.
Attempt 3: Passing by Chonky Boy (Partially Successful)
Idea: Pass tensor data pointers by value using a struct.
Implementation:
- Create a struct containing arrays of
float*for self, other, and result tensors. - Allocate memory for the struct on the CPU.
- Copy the data pointers of all tensors into the struct’s arrays.
- Pass the struct to the CUDA kernel.
- Create a struct containing arrays of
Outcome: Works initially, but encounters issues with the kernel argument space limit.
Kernel Argument Space Limit: The kernel argument space has a maximum size of 4 kilobytes.
Problem: If the struct containing tensor pointers exceeds 4 kilobytes, only a portion of the struct gets passed to the kernel, leading to illegal memory access when accessing pointers beyond the limit.
Repro Example:
params = [torch.rand(2,3, device="cuda") for _ in range(N)] torch._foreach_norm(params, ord=1) torch.cuda.synchronize()- Create a tensor list with a variable number of small tensors on CUDA.
- Call
foreach_norm(similar toforeach_add) on the tensor list. - Synchronize CUDA to ensure errors are immediately visible.
Observation: Illegal memory access occurs when the number of tensors exceeds 423.
Conclusion: The struct approach works as long as the number of tensor pointers does not exceed the 4 kilobyte limit.
Solution 1: Batching (Current Implementation)
- Idea: Divide the tensor list into smaller batches that fit within the 4 kilobyte limit.
- Implementation:
- Create multiple structs, each containing a subset of the tensor pointers.
- Launch the kernel multiple times, once for each struct.
- Outcome: Works reliably but requires multiple kernel launches, which can be inefficient.
- Visualization: Instead of a single fused kernel, multiple smaller kernels are launched.
Solution 2: Revisiting Pointers to Pointers with Memcpy
- Idea: Combine the struct approach with a memcpy operation to move the pointers to CUDA memory beforehand.
- Implementation:
- Pack the standard vectors of tensor addresses into a single tensor on the CPU.
- Copy the tensor to CUDA memory.
- Pass a pointer to the tensor data (now on CUDA) to the kernel.
- Within the kernel, access the tensor data as an array of pointers and dereference them to access the actual tensors.
- Outcome: Avoids the kernel argument space limit and enables launching a single kernel for the entire tensor list.
- Advantages:
- Reduces the number of kernel launches, improving performance, especially for large tensor lists.
- Memcpy overhead can be negligible compared to the cost of multiple kernel launches.
- Considerations:
- Requires careful memory management to avoid dangling pointers and memory leaks.
- Assumes that pointer values are consistent between CPU and GPU memory.
Solution 3: Unified Memory (Future Exploration)
- Unified Memory: Allows CUDA threads to access data allocated in CPU memory.
- Potential Benefits: Simplifies memory management and potentially reduces memcpy overhead.
- Challenges:
- Not currently usable directly from PyTorch (requires CUDA).
- Performance can be unpredictable depending on access patterns.
- Example: Paged Optimizer (Tim Dettmers): Uses unified memory to implement a paged optimizer, achieving efficient memory management.
- Future Work: Explore the feasibility and benefits of integrating unified memory support into PyTorch optimizers.
Fused Optimizers and Multi-Tensor Apply
- Fused Optimizers: Implementations like
fusedAdamWrely on multi-tensor apply to achieve vertical fusion of operations within a single kernel. - Example: FusedAdamW:
- aten/src/ATen/native/cuda/fused_adam_utils.cuh: FusedAdamMathFunctor
- Multi-Tensor Apply Callable: Uses a custom functor (
FusedAdamMathFunctor) to perform all AdamW operations within the kernel. - Functor Implementation: Handles pointer management, memory alignment, vectorization, and finally calls a math function to perform the actual AdamW calculations.
- Observation: Writing fused kernels manually is complex and requires detailed CUDA knowledge.
Torch Compile and the Future of Fused Optimizers
Torch Compile (Inductor): PyTorch’s compiler that excels at vertical fusion of operations.
Potential: Automate the vertical fusion of optimizer operations, eliminating the need for handwritten CUDA kernels.
Benefits:
- Simplifies the implementation of fused optimizers.
- Enables fusion of optimizer operations with surrounding operations (e.g., backward pass, zero grad).
Current Status:
- Works with all PyTorch optimizers that use
forEach(except L-BFGS and SparseAdam). - Requires CUDA 7.0+ and Triton.
- Can be used by wrapping the optimizer’s
stepfunction withtorch.compile.
- Works with all PyTorch optimizers that use
Example:
optimizer = torch.optim.AdamW(model.parameters())

@torch.compile(fullgraph=False)
def compiled_step():
    optimizer.step()

# ... training loop
compiled_step()
Limitations:
- Horizontal fusion (across parameters) is not yet supported by Torch Compile.
- Triton itself has limitations (e.g., thread indexing).
- Compile times can be significant, especially for large models.
Future Directions:
- Improve Torch Compile’s horizontal fusion capabilities.
- Enhance Triton’s features and performance.
- Reduce compile times through caching and optimization.
Q&A Session
Obtaining Triton Kernel Code
- Question: How to obtain the low-level Triton kernel code from PyTorch code?
- Answer:
- Use
torch.compilewith theinductorbackend.TORCH_LOGS=inductor
- When running the compiled code, Inductor will print the path to the generated Triton kernel file.
- Alternatively, use the
output_codeoption withtorch.compileto print the kernel code directly. - Jane recommends using the
inductorapproach as it’s more reliable and the output location is consistent.
- Use
Visualizing Kernel Graphs
- Question: Is it possible to generate a visual graph of the kernel?
- Answer:
- Jane hasn’t personally tried it, but it might be an advanced feature worth exploring.
- Triton kernels are generated from a dependency graph (fxGraph) created by PT2 (PyTorch 2.0).
- Accessing and visualizing the fxGraph might be more useful than a Triton kernel graph.
Compile Time Dependency on Number of Tensors
- Question: Does the compile time of Torch Compile depend on the number of tensors being processed?
- Answer:
- Yes, there is overhead related to the number of tensors.
- Functionalization: Compilers prefer functional code for optimization, but optimizers inherently update parameters in-place (non-functional).
- Initial Challenges: Early versions of PT2 struggled with optimizer compilation due to functionalization requirements, leading to long compile times (minutes for 1000 parameters).
- Improvements: Significant improvements have been made, but overhead still exists for tracing and processing large numbers of parameters.
- Ongoing Work: Torch Compile is actively addressing this general problem to reduce compile times further.
Caching Compiled Results
- Question: Is it possible to cache compiled optimizer results to avoid recompilation on subsequent runs?
- Answer:
- Yes, caching is possible and has been explored (e.g., work by Mark).
- Benefits: Primarily improves warm compilation times (when the cached result is available).
- Limitations: Doesn’t significantly address cold start compilation times (first-time compilation).
- Focus on Cold Starts: Efforts are underway to improve cold start performance by profiling and optimizing the compilation process itself.
Memory Management with Structs Containing Pointers
- Question: How to manage deep copying and memory when dealing with structs containing pointers, especially regarding garbage collection and dangling pointers?
- Answer:
- CUDA Limitations: CUDA doesn’t automatically handle garbage collection for pointers in structs passed to kernels.
- Developer Responsibility: The developer is responsible for managing the memory associated with these pointers explicitly.
- Smart Pointers (C++): Using smart pointers (e.g., shared pointers) in C++ can help with automatic memory management.
- Deep Copying Considerations: Deep copying pointers requires careful handling to avoid freeing memory prematurely or creating dangling pointers.
- Security Risks: Dangling pointers can lead to security vulnerabilities. Developers should be vigilant and report any potential issues.
- Additional Clarification:
- When copying structs containing pointers, dangling pointers can arise on both CPU and GPU sides.
- Explicit tracking and management of pointer lifecycles are crucial to prevent issues.
Memcpy Size Limit
- Question: Is there a size limit for memcpy operations?
- Answer:
- There is likely a limit, but it’s typically very large.
- Since memcpy is used to copy pointers (not entire tensors), the amount of data copied is relatively small.
- In most cases, a single memcpy operation is sufficient for transferring the necessary pointers.
Memcpy Direction Argument
- Question: Why does memcpy require an argument to specify the direction of the copy operation (e.g., host-to-device)? Can’t it be inferred from the pointers?
- Answer:
- Possibly due to historical reasons.
- CUDA supports various types of memcpy operations (device-to-device, host-to-device, etc.).
- Explicitly specifying the direction might be necessary to handle these different scenarios efficiently.
- Vikram suggests checking with CUDA API developers for a definitive answer.
Device-to-Device Copy
- Question: What are the requirements for direct device-to-device memory copy?
- Answer:
- Clarification: Device-to-device copy refers to copying within the same device (e.g., between different memory regions on the GPU), while peer-to-peer copy refers to copying between different devices (e.g., GPU 0 to GPU 1).
- Device-to-device copy can be performed through CPU API calls or directly within GPU threads using warp-level primitives.
- Specific requirements for direct peer-to-peer copy are not readily available but involve factors like GPU topology and interconnect capabilities.
- Device-to-device copy is less common than other types of memory transfers.
I’m Christian Mills, an Applied AI Consultant and Educator.
Whether I’m writing an in-depth tutorial or sharing detailed notes, my goal is the same: to bring clarity to complex topics and find practical, valuable insights.
If you need a strategic partner who brings this level of depth and systematic thinking to your AI project, I’m here to help. Let’s talk about de-risking your roadmap and building a real-world solution.
Start the conversation with my Quick AI Project Assessment or learn more about my approach.